Showing posts with label tips. Show all posts

Friday, July 11, 2008

Steps to manually mount a USB flash drive in GNU/Linux

I recently got hold of a 1 GB USB memory stick. It is a Kingmax 1 GB flash drive (U201G - U2GMHDWG) which is (believe it or not), half the size of my little finger. In fact, it is so small that there is a good chance I might misplace it somewhere if it was not tethered to a chain. Anyway, the USB stick has a FAT partition on it and contain some data which I wanted to access in GNU/Linux. I was using Ubuntu and it straight away detected the device as soon as I inserted it and it was automatically mounted in the /media/USB DISK location.

Kingmax 1 GB USB flash driveFig: The tiny 1 GB USB flash drive from Kingmax

But when I tried to mount it in a bare bones Linux distribution (a distribution which has just enough software as is needed), it was not mounted automatically. This is because the auto mounting takes place by means of a program known as hotplug which detects the USB device that is inserted in real time and then mounts it in the desired location.

So is it possible to mount a USB device (in my case the USB stick) manually ? Yes, it is possible. The idea is that the USB ports are detected by GNU/Linux as /dev/sdax - where 'x' in sdax stands for the number of the USB port. And once the USB device is connected to the USB port of your machine, you have to mount it manually.

These are the steps I followed to successfully mount the USB memory stick on my bare bones Debian Etch machine.
  1. Insert the USB stick into the USB port. My machine has 4 USB ports, 3 in the back and one at front. It doesn't matter which port you insert the device. The first USB port you use will be assigned the name /dev/sda1, the next port /dev/sda2 and so on.
  2. Check if the USB device is detected by GNU/Linux by running the following command:
    # lsusb
    Bus 002 Device 007: ID 0457:0151 Silicon Integrated Systems Corp. Super Flash 1GB Flash Drive
    Bus 002 Device 002: ID 8086:1120 Intel Corp.
    Bus 002 Device 001: ID 0000:0000
    Bus 001 Device 001: ID 0000:0000
    The first line in the output of the above command shows that the memory stick has been detected as Super Flash 1 GB Flash drive.
  3. Mount the device in the desired location. I chose to mount it in the /mnt/usbstick directory.
    # mount -t vfat -o rw,nosuid,nodev,quiet,shortname=mixed,uid=1001,gid=100,umask=077,iocharset=utf8 /dev/sda1 /mnt/usbstick
As an aside, you can do away with a lot of mount options such as nosuid, nodev and so on. The uid is necessary and is my user id number which allows me to access the device without being logged in as root. And if you are not sure of the partition on your usb stick, you can also use auto instead of vfat.

Update (19th March 2007): I forgot to mention one thing. The 'lsusb' command is used to find out if your USB device has indeed been detected by GNU/Linux kernel. If it is not detected by any chance because of non-availability of Linux drivers for your device, the command will not output the specific information. Once you are sure that the device has been detected, you can use the fdisk command to list the device(s) as follows :
# fdisk -l
which will list all the devices including the USB devices detected by GNU/Linux. Then you can use the mount command to mount it at a specific location.

Tuesday, June 17, 2008

Install multimedia codecs, libdvdcss in Debian Etch GNU/Linux

Debian having released the latest stable version of its GNU/Linux distribution, there is obviously a rush by Debian users to upgrade their distro. Debian is considered by its die hard followers to be one of the few GNU/Linux distributions which can stand up to other Unix OSes with regard to security without sacrificing those aspects which make GNU/Linux the most feature rich posix OS in the world.

But once you finish installing Debian, you need to do some housekeeping so as to enable you to play multimedia files which are encoded using proprietary or closed formats such as Microsoft's WMV files or Apple's quick time files.

This can be achieved in a number of ways:

Method I (Easy way)
  1. Open the file /etc/apt/sources.list and append the following line :
    #FILE /etc/apt/sources.list
    ...
    deb http://www.debian-multimedia.org etch main
  2. Update the packages using the command :
    # apt-get update
    Learn more on the use of apt-get and dpkg.

  3. Now you can install all the multimedia codecs as well as libdvdcss which is necessary to view DVD movies, using the following command :
    # apt-get install w32codecs libdvdcss2
Method II (Manual way)
  1. Visit the mplayer official website and download the multimedia binary codecs package (this is available in a variety of package formats). Make sure you download the package suited to your architecture and operating system. For example, there are packages for Intel32 and AMD64 architecture apart from those for Windows.

  2. Unpack them and copy them into the /usr/lib/codecs directory as follows :
    # tar -xvjf essential-20061022.bz2
    # cd essential-20061022
    # cp * /usr/lib/codecs/.
    If you do not have a codecs directory, then you have to create it first. Next create a soft link of all the files in the codecs directory to the location /usr/lib/win32/ as follows :
    # cd /usr/lib/win32
    # ln -s /usr/lib/codecs/* .
    Now you have all the win32 codecs installed on your machine which can be accessed by the media players such as totem to play WMV, Quick time and other proprietary format files.

  3. To install libdvdcss2 which is a necessary ingredient for playing encrypted DVD movies, download the libdvdcss2 library from its official site and install it on your Debian machine. They provide the binary as a Deb package which makes it really convenient. If you have downloaded it in some other package such as bzip2, then just unpack the contents and copy the two files libdvdcss.so.2 and libdvdcss.so.2.0.8 to the /usr/lib/ directory as follows:
    # tar -xvjf libdvdcss-1.2.9.tar.bz2
    # cd libdvdcss-1.2.9/
    # cp libdvdcss.so.2 libdvdcss.so.2.0.8 /usr/lib/.
That is all there is to it. Now you can view videos and play music in almost all video and audio file formats. While you are at it, it might also be desirable to download and install mplayer - a versatile audio and video player.

Note: If you still run into trouble playing your favourite audio or video files in any player, you can use the strace tool (installed by default on all Linux distributions) to troubleshoot your problem.

A collection of tips for people new to BSD

The first time I was introduced to FreeBSD - a BSD variant, I came away really impressed. In my opinion, from an end user's perspective, the only difference between a BSD and Linux is the difference in licencing. If you setup two machines - one running FreeBSD and the other running a Linux distribution with both having a KDE or Gnome desktop and ask a neophyte to point out which is which, there is a good chance that he will consider them both as running one and the same operating system. So whether you choose Linux or BSD depends largely on your tastes.

On the down side, the BSD variants fall far behind when you compare the size of their community with respect to that of Linux which commands a community which is many times that of the BSDs. But if you consider the ratio of knowledgable people to newbies, the BSD's fare better.

If you are a potential BSD aspirant and wish to try out any of the BSDs which include FreeBSD, PC-BSD, OpenBSD, NetBSD and DesktopBSD, then you might find the resource page put up by Daemon News quite helpful. It contains lots of tips to carry out tasks which a neophyte in BSD might initially find insurmountable.

Using netselect-apt - Tip to select the fastest Debian mirror

Each time I install Debian - and I have done it scores of times on multiple machines, I get frustrated in choosing the right Debian mirror for updating the package database on my machine using 'apt-get update', or installing a new package for that matter.

Some of the questions that I had to find a solution for were ... Do I choose the Debian mirror in my country (India) or do I use one of the US servers ? Is there any way to find which of the two are the fastest for my geographic location ?

It might sound ironical, but experience tells me that the truism of choosing a Debian apt mirror closest to ones location does not hold true for me. Because at all times, when I have used a mirror from India, it is dead slow. And believe it or not, the responsiveness of the mirror will do a great deal of difference to how fast you are able to update your Debian machine.

Enter netselect-apt, a package which helps one to find and use the fastest Debian mirror for his region. What this script does in conjunction with 'netselect' command is, it first downloads a list of all the Debian apt mirrors from the official Debian website using wget. The list is saved in a file named 'mirrors_full' in your current directory. It then checks the responsiveness of each of the servers in the list and then selects the fastest among them. Finally it writes the necessary code in the sources.list file and saves it in your current directory. Considering that on last count there are a total of 248 Debian mirrors to choose from, that is a pretty tedious job.

In order to use netselect-apt, the first thing you have to do in your newly installed Debian machine is download and install the netselect-apt package. This can be done as follows :
# apt-get install netselect-apt
The netselect-apt package depends on the netselect package and so it will also be automatically installed.

You can pass a couple of options while invoking the netselect-apt command. For instance, I have Debian Etch installed on my machine. And if I want to find the fastest Debian Etch repository mirror for my geographic region, I run the netselect-apt command as follows :
# netselect-apt etch
If I want it to include non-free software section as well while creating the sources.list file, then I use the -n option :
# netselect-apt -n etch
You can also ask netselect-apt to select only ftp servers instead of http ones by passing the -f option.
# netselect-apt -n -f etch
Apart from etch, you can pass the following options - stable, testing, unstable, experimental, woody, sarge and sid. If you choose not to pass any options, then by default netselect-apt uses 'stable' as the option.

Once it finishes its work, you will find a newly created sources.list file in your current directory which will have the necessary code pointing to the fastest Debian server for your location. Now all you have to do is to copy the sources.list file to /etc/apt/ directory and do an apt-get update.
# cp ./sources.list /etc/apt/sources.list
# apt-get update
Please note that the speed of the servers change over a period of time and is dependent on a variety of external factors. So the server that netselect-apt chooses today need not be the fastest one for you say, a couple of weeks hence. So if you are in the habit of installing and updating software all the time, it will be prudent to run netselect-apt once every week or so and update your sources.list file to point to the fastest mirror.

Work productively without starting X server in Linux

When was the last time you logged into a console only mode in Linux ? By console only mode I mean in run level 2 or 3 where X server is not running? Obviously now-a-days you needn't resort to such a drastic step as the GUI applications have gotten richer and the end user has a variety of choices before him. More over, most Linux distributions boot into graphical X by default the very first time they are installed. I am willing to bet that in a couple of years time, the new users embracing Linux won't have any idea of what a console mode is unless somebody specifically tell them.

This was not the same till a few years back (go back to 8 years) when even the average user had to first deal with the console mode and learn to start X by running a command before he was put into a graphical environment. He had to learn the syntax of the XF86config file (it is now xorg.conf), learn to use a console editor and so on before he was able to enjoy the fruits of Linux in GUI mode.

On this note, if you are wondering how the heck then the people using Linux were productive, it seems there were a number of command line tools at ones disposal. They are still around (if one bothers to look). Luke at "Terminally Incoherent" blog has compiled a nice list of command line tools in an article titled "A day without X", where he lists console programs that help one to accomplish common tasks like sending and receiving emails, web browsing, viewing images and so on. Another blogger, K.Mandala has also compiled his own list of command line applications which you can read here.

Who knows, if you face a situation where your favorite uncle gifts you with a 486 machine loaded with a stripped down version of Linux as a birthday present, you can genuinely be happy (instead of just pretending) and assure him that you will put it to good use....

10 Linux shell tricks you don't already know

Venture cake - a new blog on the horizon has written an insightful piece on the different ways in which one can use common commands to achieve complicated tasks in Linux.

The blog author provides examples in achieving the following :
  • A simple way to send output and errors to the same file. It is known as input-output redirection which I had covered a long time back.
  • Parallelize your loops by backgrounding them.
  • Catch memory leaks by using top command via cron.
  • Redirect output from other programs as standard input to a command directly from the command line.
  • Set a random initial password and force the user to change it.
  • Add Your Public Key to Remote Machines the Easy Way
  • Extract an RPM without any additional software
  • See How a File Has Changed from Factory Defaults
  • Undo Your Network Screwups After You’ve Lost the Connection
  • Check which Ports are Open on a remote machine using 'nc' command.
  • The Easy Way to Extract Tar Archives
  • Use Bash Shell variables - not the same as Bash shell shortcuts - I may add.
  • Never reboot a system for NFS failures
Apart from listing examples of each of them, he also provides in a couple of sentences the benefits and drawbacks of each trick. Check out this very interesting article to find out about the examples and explanation provided.

Performance tweaks for Ubuntu Feisty Fawn

Ubuntu is well on its way to becoming the neophytes Linux distribution going by the recent news of Dell deciding to sell their PCs pre-loaded with Ubuntu. And indeed Ubuntu is an excellent candidate for being pre-loaded on Dell PCs - what with its out of the box support for most peripheral devices.

Agreed, I have run into trouble in installing the latest version of Ubuntu (Feisty fawn) on my 2 year old Pentium IV machine with around 630 MB SDRAM as do many others. But this is something which I believe will be sorted out in later versions of Ubuntu - and I am willing to wait. In all other respects, we have a very promising distribution here which is based on the cutting edge Debian unstable.

Micke has written a good article explaining ways of speeding up your machine running Ubuntu Feisty Fawn. Apart from installing all the media codecs to make it a complete desktop, he also provides over 14 ways of fine tuning your Ubuntu so as to make it run faster.

Tuesday, June 3, 2008

Tip: Download Accelerator for Linux

There are different ways of downloading files from remote locations. While all web browsers support downloading files via http or ftp, I have found that in the case of Firefox (at least), it doesn't support resuming downloads. While this is not a problem for files of small size, when it Linux distributions, this lack of support for resuming downloads from where you had left off earlier would mean you have to start downloading the file again from the beginning.

The most common and fail safe method of downloading huge files in Linux is to use the wget tool. of the file at a later stage in the event the downloading fails due to connection time out.

I usually use the following wget command to download Linux distributions.
$ wget -c full_path_to_the_linux_iso

But here is a nice tip to speed up your download of files by a significant factor. This tip is and above. Usually different mirrors have different speeds. A Linux distribution mirror in say Japan may have a 100MBps connection but another mirror in a different location will be connected only to a 10 MBps pipe. More over these mirrors throttle the bandwidth made available for each individual connection thus providing a upper limit of download speeds.

What you can do is split the file (in our case the ISO image) you are downloading into a number of pieces and download each piece from a different mirror simultaneously. At the end of the download, you can combine all the pieces together to get your file in one piece. This is known as download acceleration where the software connects to more than one location simultaneously and splits the downloads among the locations. This feature is commonly found in many download managers for Windows but is hard to find in those available for Linux.

You can get the same feature in Linux too by using the program curl to download your files.

$ curl --range 200000000-399999999 -o ubuntu-iso.part2 $url2 &
$ curl --range 400000000-599999999 -o ubuntu-iso.part3 $url3 &
$ curl --range 600000000- -o ubuntu-iso.part4 $url4 &
Where url1, url2, url3 and url4 are as follows ...
url1=http://ubuntu.intergenia.de/releases/feisty/ubuntu-7.04-desktop-i386.iso
url2=http://ubuntu.virginmedia.com/releases/7.04/ubuntu-7.04-desktop-i386.iso
url3=http://es.releases.ubuntu.com/7.04/ubuntu-7.04-desktop-i386.iso
url4=http://ftp-mirror.internap.com/pub/ubuntu-releases/7.04/ubuntu-7.04-desktop-i386.iso
This creates four background download processes, each transferring a different part of the ISO specifies a subrange of bytes to extract from the ISO file. The -o option provides the name of the file to which the data is to be saved. So once all the four curl processes finish their download, you will have four files namely ubuntu-iso.part1, ubuntu-iso.part2, ubuntu-iso.part3 and ubuntu-iso.part4 in your current directory.

To get the original Ubuntu ISO file, I just combine the files using the cat command as follows :
$ cat ubuntu-iso.part? > ubuntu-7.04-desktop-i386.iso
As I said earlier, if you have a high speed Internet connection then this method will considerably shorten the time taken to download huge files.

As an aside, I have entered all the commands in a file as follows :
#FILE NAME : da.sh (Download accelerator)
#!/bin/sh

url1=http://ubuntu.intergenia.de/releases/feisty/ubuntu-7.04-desktop-i386.iso
url2=http://ubuntu.virginmedia.com/releases/7.04/ubuntu-7.04-desktop-i386.iso
url3=http://es.releases.ubuntu.com/7.04/ubuntu-7.04-desktop-i386.iso
url4=http://ftp-mirror.internap.com/pub/ubuntu-releases/7.04/ubuntu-7.04-desktop-i386.iso

curl --range 0-199999999 -o ubuntu-iso.part1 $url1 &
curl --range 200000000-399999999 -o ubuntu-iso.part2 $url2 &
curl --range 400000000-599999999 -o ubuntu-iso.part3 $url3 &
curl --range 600000000- -o ubuntu-iso.part4 $url4 &
... set the executable bit of the file and then I run it.
$ chmod u+x da.sh
$ ./da.sh

How to find out if your Linux machine has been hacked ?

It is very rare that your Linux PC which you use as a Desktop will get compromised especially if you do not run any services like a web server, mail server and so on. More over many modern Linux distributions like for example Ubuntu, targeted at the end user ship with all the ports closed by default. And others like PCLinuxOS bundles with it a robust firewall. So it makes the job of an intruder all the more harder to crack into your machine.

But suppose after all the precautions you take, some resourceful cracker succeeds in finding a loophole and hacks into your machine, how do you detect that your machine has been compromised in the first place?

Lars has written a step-by-step process by which he ascertains that a Linux server run by his friend has been compromised by an intruder. His findings throw light on what you can expect and the steps to take when you are suspicious of getting your machine rooted.

The server was running a fairly updated Ubuntu 6.06 LTS. He goes on to conclude that the compromise could have been caused by :
  1. An exploit unknown to the public.
  2. A user accessing this server from an already compromised host. The attacker could then sniff the the password.
Read this very interesting article which throws some light on the actions of a hacker.

Set up an Apache web server cluster in 5 easy steps

A server cluster is a group of independent servers that are managed as a single system for higher availability, easier manageability, and greater scalability.

In a Web server environment, server clusters can be defined in two basic ways:

Active/Active
  • There are multiple independent, redundant servers
  • The load is distributed through round-robin DNS
  • The load is balanced by a load-balancing solution
Active/Passive
  • Multiple servers are configured to provide a service
  • Only a single server provides the service at any given time
  • Other servers serve as hot-spares in case of a server (service) problem or a site hosted on the servers suddenly start getting load spikes such as when being slashdotted.
Now a days, many shared web hosting providers are turning to a web server cluster solution over managing individual web servers on independent machines. Clustering is said to provide some respite to the performance issues.

Eli M. Dow and Frank LeFevre, both, Software Engineers at IBM have written this insightful albeit rather technical article which explains how to setup an Apache web server cluster in 5 easy steps.

From the article ...
Spreading a workload across multiple processors, coupled with various software recovery techniques, provides a highly available environment and enhances overall RAS (Reliability, Availability, and Serviceability) of the environment. Benefits include faster recovery from unplanned outages, as well as minimal effects of planned outages on the end user.

To get the most out of this article, you should be familiar with Linux and basic networking, and you should have Apache servers already configured. Our examples are based on standard SUSE Linux Enterprise Server 10 (SLES10) installations, but savvy users of other distributions should be able to adapt the methods shown here.
Learn how to set up an Apache web server cluster in 5 easy steps.

Howto: Build an selinux policy the Red Hat enterprise way

Red Hat / Fedora has now got GUI tools to help edit and create SElinux policy files. And it is much more simpler to create a custom selinux policy in Red Hat Enterprise Linux.

In this detailed article, Dan Walsh gently walks you through the policy module creation process.

A lot of people think that building a new SELinux policy is magic, but magic tricks never seem quite as difficult once you know how they’re done. This article explains how to build a policy module and gives you the step-by-step process for using the tools to build your own.

Read more on a step by step guide to creating an selinux policy module explained by Dan Walsh.

Update: Also check out this PDF presentation on Managing Red Hat Enterprise Linux 5 which also contain information on SELinux.

Tweak your host file to block ad generating web sites

Here is a cool tip to block ad generating websites from serving ads while you are browsing the web. The idea is to direct all the domains pointing to the ad serving sites to your localhost aka 127.0.0.1 . Now, the next time you visit a website and the website is serving an ad from a domain which you have directed to your localhost, you will see a blank space at the position where the ad was to be served.

This is done by inserting lines in your host file (/etc/hosts) on your Linux machine which are in the following format one domain per line :

FILE: /etc/hosts
127.0.0.1 localhost
127.0.0.1 ad.doubleclick.net
127.0.0.1 xx.adserver.xxx
...
... and so on.

One thing worth noting is that once you have collected (almost) all the ad serving sites domains, the resulting host file will be really huge as there are an ever growing collection of companies which make a living serving ads on publishing sites. More over, after some time it gets a bit tedious to update the /etc/hosts file on a regular basis.

LittleUbuntu has a nice writeup about implementing this feature in Ubuntu as well as a link to the original article.

Is it possible to hack into a gmail address ? - Really scary

Who doesn't have a gmail id now a days ? In my honest opinion, I am yet to discover a more user friendly web mail host. Gmail is non-intrusive, provides all the advanced and usable features such as POP3, mail search and much more.

But recently at a Black Hat security convention, Robert Graham, the CEO of errata security, surprised attendees by hijacking a Gmail session on camera and reading the victim’s email. He went even further by demonstrating the attack by taking over another journalist’s Gmail account and then sending emails from that account. Really scary.

So how do you protect yourself from somebody sniffing your email while it is in transit and then hacking into your gmail account ? There is one way to make it much harder for sniffing your mails. That is by sending and receiving mails using Gmail's SSL feature. SSL stands for Secure Sockets Layer and is used to provide secure data transfer across the web, for instance ecommerce sites use SSL to transmit your credit card details. Google provides the SSL feature for gmail and all it takes to enable SSL in Gmail is by typing the address https://mail.google.com instead of http://mail.google.com. Make note of the 's' in 'https'. What this does is instead of encrypting only the username and password, Gmail encrypts the whole mail session and this makes it possible to transfer your mails in a secure manner.

So the next time you decide to log on to your gmail account, use https instead of http and you will be fairly safe from getting your mail sniffed in transit.

Portable Apps - Carry all your favorite Open Source applications where ever you go

Recently while visiting a friends house, I ran into a situation where I had to use his computer. His computer is a rather old one which he has seldom maintained properly. He still has Windows 98 loaded on it. The very same Windows OS which came pre-installed on his computer when he bought it a couple of years back. And most applications including the web browser (IE) have not been updated. In fact the web browser he has on it is IE 4.0. And as you will know, IE 4.0 does not have good CSS support and so render most websites poorly. And on top of all that, he is so tech phobic that he was not inclined to allow any other software on his machine.

That was when I felt the need for a solution where in I could use a standalone version of my favorite applications. And after some googling, I came across this unique website called portableapps.com which has a collection of many Open Source and GPLed software which I use on a daily basis.

The idea is that you can use these applications without installing on the hard disk. For instance, faced with a situation such as mine, you can easily carry all the applications on a USB stick and then just plug in the USB stick and click on the necessary application to start using it. It is as simple as that.

The website provides the portable applications bundled as a suite in two different formats which is :
  • Standard format 89.5 MB and
  • Lite format 30.4 MB size
At present, there are over 50 different open source applications including the latest version of Firefox (2.0). And all the applications are guaranteed to work in Windows 98, Windows 2000, Windows XP, Vista and Wine. Some applications are also known to work in Windows 95 too.

Advantages of using portable apps
You can carry the following things with you on a USB stick ...
  • Your web browser with all your favorite bookmarks
  • Your calendar with all your appointments
  • Email client with all your contacts and settings
  • Instant messenger and your buddy list
  • The whole office suite (OpenOffice.org) along with your documents and presentations
  • An anti-virus program and other computer utilities
  • All your important passwords and account information securely.
You can also put portable apps to use in diverse ways such as ...
  • Have your favorite websites handy to recommend to a friend or colleague
  • Have your presentation AND the required software ready to go for that big meeting
  • Have your password with you if you want to bank online while traveling
  • Have utilities handy when visiting family or friends that are having PC problems
If you are always on the move and are forced to use computers not your own, then this handy suite of open source applications will be a real convenience to you especially if you are wedded to using open source applications to get your job done.

Determine the virtual terminal you are using in GNU/Linux

Have you ever had to determine the virtual terminal that an X session is running on? Perhaps you may want this information for a program you have created. It is possible using the fgconsole command.
# fgconsole
7
Just running fgconsole will print the number of the active virtual terminal. For the uninitiated, by default, you have 7 virtual terminals on your Linux machine. You can switch between them using the Ctrl+Alt+ key sequence.

Usually, your Linux machine will be using any virtual terminal which is available for displaying X. But if the following two parameters are enabled in your /etc/gdm/gdm.conf file, then it will always use the same terminal.
#FILE /etc/gdm/gdm.conf
FirstVT=7
VTAllocation=true
You may also do the following to see which virtual terminal your X session is using :
$ grep VT /var/log/Xorg.0.log
(++) Using VT number 7

Saturday, May 31, 2008

Install multimedia codecs in Ubuntu 7.10 Gutsy Gibbon in 2 easy steps

Ubuntu is a fantastic Linux distribution and its development is right on track. While I have had issues in running Ubuntu 7.04, Feisty Fawn on my machine, the latest release namely version 7.10 (Gutsy Gibbon) turned out to be a heck of a distribution. Not only does it work flawlessly on my machine, the Ubuntu developers have also incorporated a number of features which brings it at par with or in some cases even excels Mac OSX in functionality and ease of use.

But at the same time, unlike many other Linux distributions (read Mandriva et al), the Ubuntu developers have not succumbed to providing the proprietary codecs and drivers out of the box. In fact, they have walked a fine line by making sure the distribution remains Free as in freedom, at the same time have made it very simple for people who want to surely install any proprietary drivers for their machine.

For example, here is how you can install all the proprietary multimedia codecs automatically on your machine running Ubuntu Gutsy Gibbon.

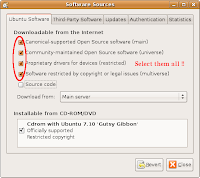
First thing you have to do is to navigate in the Gnome panel to "System -> Administration -> Software Sources" and enable all the additional repositories namely main (which should already be enabled), universe, restricted and multiverse. Truth be told, you need select only the multiverse repository but while you are at it, you might as well enable the rest of them too.

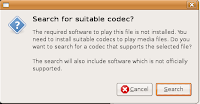
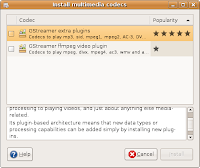
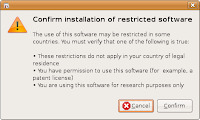
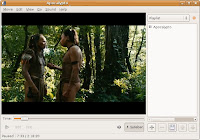
Once you have done that, navigate to your video or audio file and try playing it in Totem which is the default multimedia player for GNOME. When you open the media file in totem, it will notify you that it can't find the necessary codecs to play the file and will offer to search for and download the necessary files. It will then start downloading the missing pieces and install them. That is it. You have finished installing the codecs necessary to play your multimedia file.

Fig: Enable all additional repositories


Fig: Totem asks you whether it should search for the necessary codecs to play the media.


Fig: Totem searching for required multimedia codec packages


Fig: It provides a list of packages which contain the required files


Fig: Asks for confirmation.


Fig: Totem playing the movie after it finished installing the required codecs.

As a side note, I have found that this is the same process that is followed by the Windows media player when it can't find the necessary codecs. But there is a significant difference though, in Ubuntu Gutsy Gibbon, this process works flawlessly where as in Windows, it gives an error ;-).

Alternately, if you do not want to go through the above process (though I wonder why), you can also install all the multimedia codecs by firing up a terminal and running the apt-get command as follows :

$ sudo apt-get install gstreamer0.10-plugins-bad gstreamer0.10-ffmpeg gstreamer0.10-fluendo-mp3 gstreamer0.10-plugins-ugly
You must be wondering, if there are bad and ugly gstreamer plugins there should be the good ones too right ? Well the good gstreamer plugins are installed by default on your Ubuntu machine and so you need not install them manually.

Finally, for the brave at heart, you can also install the multimedia codecs manually as explained in this article.

A problem encountered by laptop users running Ubuntu Gutsy Gibbon and a possible solution

A number of people are blogging about how running the latest version of Ubuntu Gutsy Gibbon on a laptop could possibly end up causing an early demise of the laptop hard disk. The problem is that the hard disk essentially consists of a spindle and a bunch of disks stacked one on top of the other which rotate at high speeds. Now as with all objects which have moving parts, hard disk also faces wear and tear. The problem faced by Ubuntu laptop users is the aggressive use of hard disk by Ubuntu thus shortening the life of the hard disk.

A bug submitted at launchpad confirms this anomaly. So what is the solution to this rather irritating problem ?

Use hdparm; a command line tool to disable advanced power management (APM). This is achieved by running the following command :
$ sudo hdparm -B 255 /dev/sda
Here the -B option is used to set the APM value. A low value means aggressive power management (that translates to more wear and tear for your hard disk) and a high value means better performance (but more battery consumption). By setting the value as 255, we have disabled the APM all together. Over 2 years back, I had written an article explaining how to improve your hard disk performance using hdparm. And if you are interested in knowing more about hdparm, you may read the article.

I run Ubuntu Gutsy Gibbon and it doesn't cause this problem on my desktop PC.

Check out the opinions from two sources [ linux hero and Planet Beranger ] to get a different angle.

So you want to be a System Administrator ? Here is how ...

What is the job profile of a System administrator ? Obviously he is in charge of managing the servers and making them work flawlessly. But is that it ?

Ask a person like James Hicks who has over 10 years experience working as a system administrator and he will tell you there is a lot more to the job than just managing servers.

But lets start from the beginning; what does it take for a fresher to land a job as a system administrator ? First and foremost, you need three things namely, Intelligence, an interest in Computers and last but not the least people skills.

James has written a 3 part series [ Part 1, Part 2, Part 3 ] providing insights into the art of snagging, managing and thriving as a system administrator which is a worthy and informative read. He even gives his personal opinion about the various certifications in the market and their worthiness.

An excerpt from the article :
Good systems administrators in good companies spend the bulk of their time preventing bad things from happening and finding new ways for IT to improve their organization’s efficiency. Bad systems administrators or good ones in bad companies spend the bulk of their time fixing problems that come up - usually the same problems over and over again.

Read more

Migrate your custom domain email to Gmail

Google is slowly but surely laying out a plethora services with the customers or end users in mind. Seriously, I will really be at a loss to list all the services that Google provides - there are that many. What really sets Google apart from the pack crowd is its obsession with simplicity and customer comfort in mind. Any day, I would rather use a clean, spartan Google interface to the ad infested slow loading mishmash of a webpage put together by its competition.

Here is yet another interesting service from Google you might be interested in. The service is called Google Apps and it allows those with their own domain to move their entire mail infrastructure to Google.

Daniel Miessler has an interesting take on how he accomplished moving all his mail from his web host to Google all the while keeping his mail id the same ie in the format mail [at] dmiessler.com.

Google provides its Google Apps in three editions depending on the number of features you need. The standard and education edition are provided for free and has pretty much all the features that a small business or an individual needs. But if you want more then they also provide a premium edition for which they charge a nominal $50 per year.

Over 10 power user tips for Vim editor

After using Vi or Vim for a couple of days, ever been left wondering what is it that makes Vi enthusiasts sing eulogies of this geeky text editor ? Then here are a number of reasons which will make you wonder why you hadn't embraced Vim sooner.

Swaroop C H has compiled over 10 specific ways to improve your productivity with Vim. These are the same functionality he found in Emacs and for which he provides equivalent commands in Vim.

The tips include :
Swapping caps-lock and Control keys, using incremental search for navigation, Making better use of the buffers in Vim, mastering vim regular expressions and picking up fine grained text manipulation commands in Vim among many others.

Most of the settings he lists can be made permanent by entering them in your .vimrc configuration file which resides in your home directory in Linux. Of course, if you are still putoff then there is another project called Cream for Vim which will save the day for you.

Apart from providing the power user tips, he also lists some additional plugins which further extends the functionality of this wonderful editor. Do read his tips to know more.

Read more